


Side Sleeper Pillow Position: The Complete Setup for Better Sleep
TL;DR: The right pillow position for side sleepers requires two things: a head pillow tall enough to keep your neck level, and a pillow between your knees to stop your hips from twisting. Get both right and you wake up without neck stiffness, shoulder aches, or lower back pain. This guide covers every pillow placement, common mistakes, and how to build your complete setup tonight.
If you sleep on your side and still wake up sore, your side sleeper pillow position is almost certainly the problem. Most people have a pillow under their head and think that covers it. It doesn't. Side sleeping puts your body in a structural situation that needs support in multiple places, not just one.
The good news is that fixing your pillow position doesn't require a new mattress or a physio appointment. It usually comes down to two or three pillows arranged the right way. Once you get the setup right, the difference in how you feel in the morning can be dramatic.
This guide walks you through every pillow placement side sleepers need: where your head pillow should actually sit, why the pillow between your knees matters, how to protect your shoulder, and how to adjust based on your specific sleeping style. Whether you curl up tight in the fetal position or sleep with your legs straight, there's a setup here that works for you.
What Is the Right Pillow Position for Side Sleepers?

The right pillow position for side sleepers keeps your spine in a straight, neutral line from your hips through your neck. Your head pillow fills the gap between your ear and the mattress. A second pillow between your knees keeps your hips level. Both together stop your spine from twisting or sagging overnight.
Most people skip the knee pillow. Most people also complain about neck and back pain. These two facts are connected. A single pillow under your head solves only half the alignment problem. The other half is happening down at your hips.
If you want to go further, a body pillow to hug keeps your top arm from pulling forward and rotating your shoulder. It also gives you something to anchor against so you stay on your side through the night rather than rolling onto your back.
Why Does Pillow Position Matter So Much for Side Sleepers?
Side sleepers carry most of their body weight through one shoulder and one hip. Without proper pillow support, those pressure points get compressed and your spine falls out of alignment. Over time, a poor setup leads to neck stiffness, shoulder pain, and lower back tightness that greet you every morning.
Research published in the International Journal of Environmental Research and Public Health confirms that pillow height and position significantly affect cervical spine curvature during side sleeping. Even a small misalignment at the neck compounds across eight hours because your muscles have to work to compensate for it. After a full night of that, your body knows.
A randomized comparative trial in the Journal of Manipulative and Physiological Therapeutics found that pillow type meaningfully alters cervicothoracic spinal posture in side-lying positions. It's not just about comfort. The way your pillow holds your head actually changes the shape of your spine while you sleep.
Where Should Your Head Pillow Actually Sit?
Your head pillow should be tucked snugly between your shoulder and the base of your neck, not pushed down under your shoulder. The goal is to bring the mattress surface up to meet your head so your neck stays horizontal. If your ear tips toward the mattress, your pillow is too thin.
A quick visual check: lie on your side and have someone look at you from behind. Your ear, shoulder, and hip should form a straight vertical line. If your head is tilting up, your pillow is too thick. If it's drooping down, it's gone flat or doesn't have enough loft.
Research on pillow height biomechanics shows that incorrect pillow height increases cranio-cervical pressure and disrupts cervical alignment, both of which contribute to morning pain. The guide on pillow height for side sleepers breaks down exactly how to measure the right height for your shoulder width.
Pillow material also plays a role in how well your head pillow holds its position through the night. A study on pillow type and cervicothoracic posture found that pillow height changes as a material compresses under body weight, which means a soft feather pillow can sink enough to shift you out of alignment by midnight. The comparison of latex vs. memory foam for side sleepers covers which materials hold their loft most reliably overnight.
Should You Put a Pillow Between Your Knees?
Yes, and it makes more difference than most people expect. When you sleep on your side without a pillow between your knees, your top leg falls forward and rotates your pelvis. That pulls your lower spine out of its natural curve. A pillow between your knees stops that rotation and keeps your hips stacked.
The Sleep Foundation notes that a pillow between the knees helps maintain natural hip and pelvic alignment and reduces strain on the lower back, particularly for people with existing back issues. The Mayo Clinic agrees, recommending that side sleepers draw their knees up and place a firm pillow between them to reduce lower back stress.
It doesn't have to be a dedicated knee pillow. A regular pillow folded in half works. If you have lower back pain or hip discomfort, extend the support down the full length of your legs instead of just at the knees. This keeps your entire lower body in alignment from hip to ankle.
For more on this, the guide on how to elevate your legs while sleeping on your side covers leg positioning in more detail, including when elevation is better than a flat knee pillow.
What About Your Shoulders and Arms?
The shoulder you're lying on takes the most pressure in any side sleeping position. If your pillow isn't high enough, your shoulder gets compressed into the mattress and your neck cranks sideways to compensate. Proper pillow height lifts the load off that shoulder and lets the joint sit in a neutral, decompressed position.
Physical therapists at Limitless PT explain that side sleepers often press directly onto the rotator cuff tendons and bursa for hours at a time, leading to inflammation, microtears, and morning pain. If you wake up with a sore or numb shoulder, your pillow is likely too flat.
Your bottom arm needs attention too. Most people tuck it underneath themselves or let it splay straight out. Both cause problems. A 2025 guide from MedCline on pillow positioning for arm numbness recommends keeping the bottom elbow slightly in front of your body rather than pinned underneath, which relieves pressure on the nerves running through your shoulder and armpit.
Your top arm is part of the equation as well. When it has nowhere to go, it falls across your body and internally rotates the shoulder joint. Hugging a body pillow keeps the top arm in a neutral position and takes the torque off both shoulders overnight.
Does Your Side Sleeping Style Change the Setup?
Yes. Most side sleepers fall into one of three positions: fetal (knees pulled toward the chest), log (legs straight), or yearner (arms stretched forward). Each puts slightly different pressure on your spine and hips, which means the ideal pillow placement shifts depending on how you naturally curl up.
Fetal position: Your hips and spine are already somewhat flexed, so spinal rotation is a smaller risk. The knee pillow is still valuable, but a softer one works since your legs are naturally closer together. The main risk with a tight fetal position is curling too hard, which compresses your chest and strains your lumbar spine. Try not to tuck your chin into your chest.
Log position: Your body is straight, so you need a firm, well-lofted head pillow to keep your neck fully level. A knee pillow matters more here because your legs don't naturally stay stacked the way they do in the fetal position.
Yearner position: Arms stretched forward tend to pull the shoulders into internal rotation over time. Use a body pillow between your arms, rather than just hugged to your chest, to keep both shoulders in a more neutral forward position.
If you've been wondering whether the left or right side has extra health benefits beyond just alignment, there are some compelling digestive and cardiovascular reasons to favor the left.
How to Put the Whole Setup Together Tonight
You don't need to overhaul everything at once. Start with the two highest-impact changes and add from there.
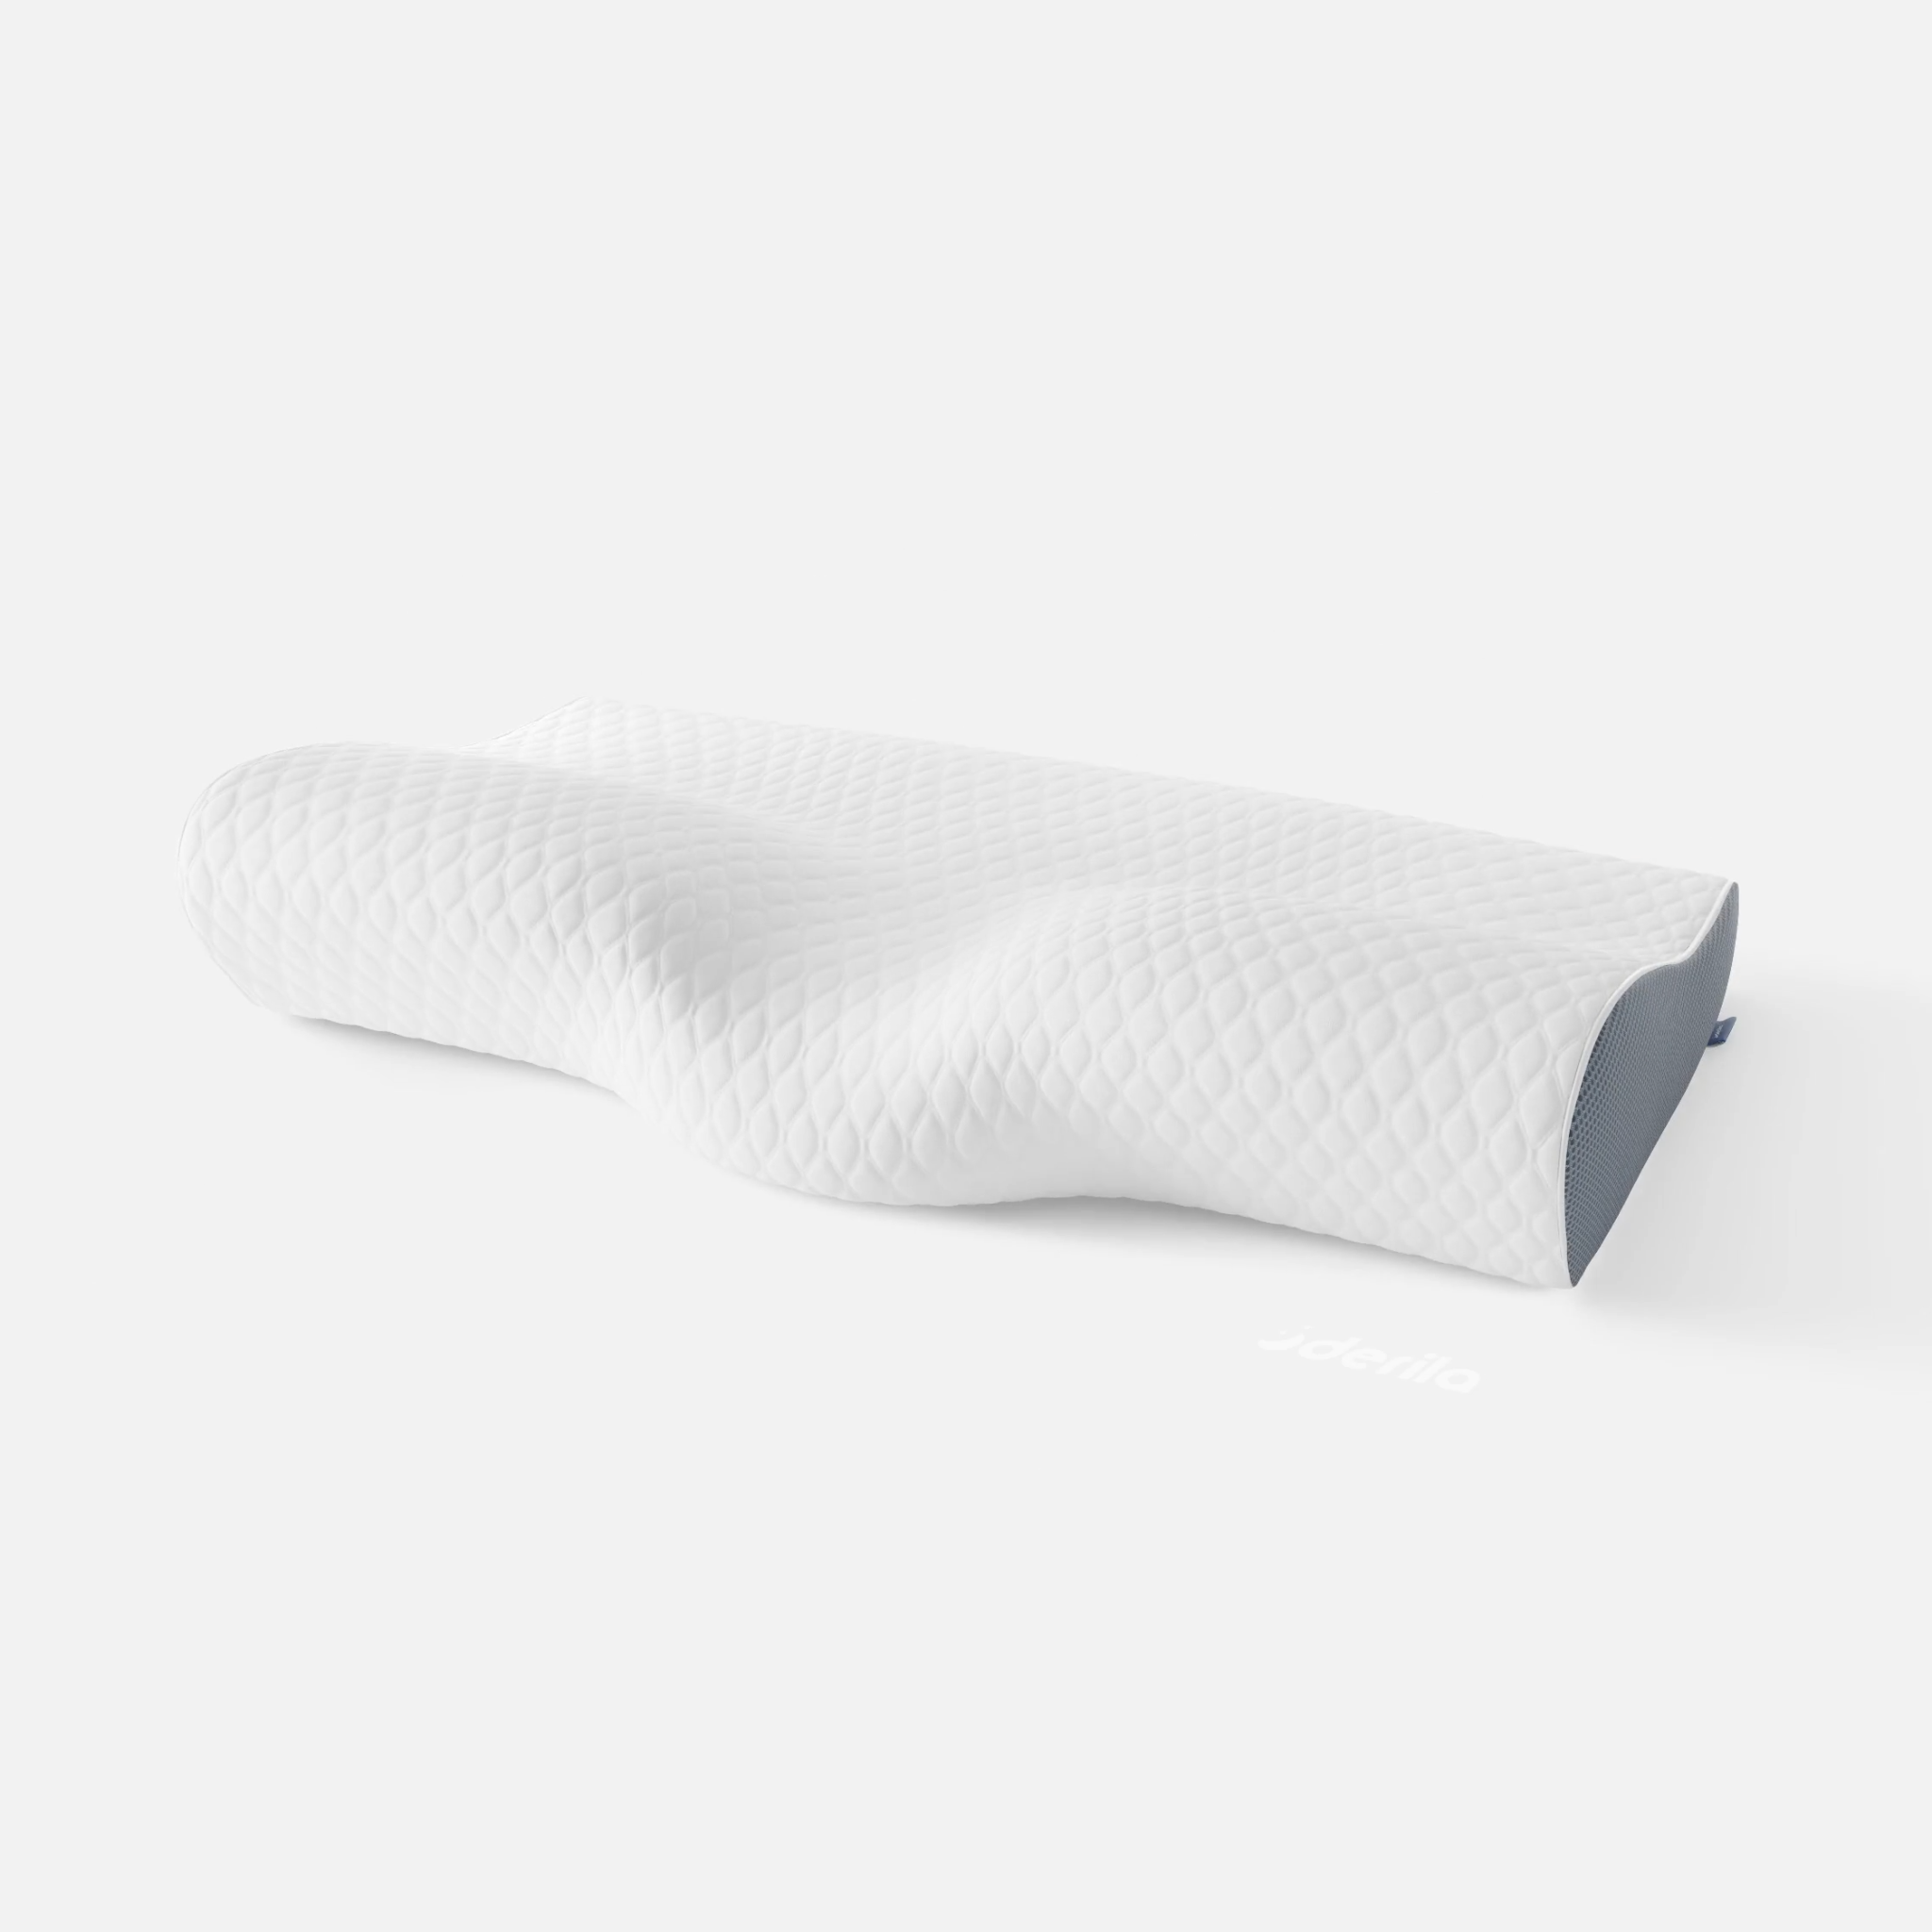
Step 1: Fix your head pillow. It should hold its shape under the weight of your head and sit tall enough to keep your neck level. The Derila side sleeper pillow is designed with a higher loft built specifically for the shoulder-to-ear gap that side sleepers need to bridge. If you're unsure between soft and firm, the soft or firm pillow guide for side sleepers can help you figure out what your body type and sleeping style actually needs.
Step 2: Add a pillow between your knees. Fold a standard pillow in half or grab a dedicated knee pillow. Place it between your knees so your top leg doesn't fall forward. This one change alone can make a noticeable difference to lower back pain within a few nights.
Step 3: Sort out your arms. Keep your bottom arm slightly in front of your body rather than pinned underneath. Hug a second pillow or body pillow with your top arm to keep it forward without rotating your shoulder.
Step 4: Check in the morning. If you're still waking up with neck or shoulder stiffness, your head pillow height is the first thing to adjust. If your lower back aches, try moving the knee pillow higher between your thighs rather than just at the knees, or use a firmer one that doesn't compress overnight.
The whole setup takes under a minute to arrange. Most people notice a real difference within three to four nights.
You're One Setup Away From a Better Morning
Getting your side sleeper pillow position right doesn't take much. A head pillow that holds your neck level, a pillow between your knees, and a way to keep your top arm supported. Those three things cover the majority of the alignment problems side sleepers deal with.
If you've been sleeping on your side for years without fixing the setup, the payoff can feel significant. Less stiffness, fewer aches, and more actual rest.
Start with the head pillow since that's where most of the damage happens. The Derila side sleeper pillow is built for exactly this purpose. Try the full setup tonight and see how different tomorrow morning feels.
Frequently Asked Questions
What is the correct pillow position for side sleepers?
Your head pillow should sit between your shoulder and the base of your neck, filling the gap so your neck stays level with your spine. A second pillow between your knees prevents your hips from rotating and keeps your lower spine aligned. These two placements together form the foundation of a healthy side sleeping setup.
Should a side sleeper's pillow go under the shoulder?
No. Your pillow should rest at the side of your head and neck, not underneath your shoulder. Placing it under the shoulder lifts one side of your upper body and puts your neck at a worse angle. Your shoulder rests on the mattress while the pillow bridges the gap between the mattress and your head.
How many pillows does a side sleeper need?
Most side sleepers benefit from at least two: one under the head and one between the knees. A third pillow to hug provides arm and shoulder support and helps keep you anchored on your side through the night. Three pillows is a solid starting point. Your specific needs may shift based on your body width, sleeping style, and whether you have any existing pain.
Why do I wake up with neck pain even though I sleep on my side?
The most common cause is a pillow at the wrong height. If your head pillow is too thin, your neck sags toward the mattress. If it's too thick, your neck bends upward. Both create muscle strain over the course of the night. A pillow specifically designed for side sleepers, with enough loft to fill the shoulder-to-head gap without overcorrecting, usually resolves this quickly.
Does sleeping on your side hurt your shoulder?
It can if your pillow isn't high enough. When your pillow is too flat, your body weight presses directly onto the shoulder joint and compresses the rotator cuff tendons. The fix is a taller head pillow that takes some of that load off the joint. Keeping your bottom elbow slightly in front of your body rather than pinned beneath you also helps by reducing nerve compression in the shoulder and armpit.